本篇要示範的是怎麼將已經推上去的檔案拉回本機端
如果要看怎麼將專案推上去請去看上一篇
文章的上篇內容請點此
首先點選Clone a Git repository,並且貼上你要拉下來專案的連結
如果在這一步出現 「Internal error; consult Eclipse error log.」
請到使用者user目錄下的「.eclipse\org.eclipse.equinox.security」資料夾內刪除「secure_storage」這個檔案,然後重新啟動eclipse。
如果你專案推了很多奇怪的支線進去你就要知道你要拉下來的是那一枝了
不過一般來說看到這畫面應該都是直接下一步才對
這個路逕是以後你要找檔案的地方,選個你方便找檔案的路徑
再來要複製專按,點你拉下來的Repository右鍵→Import Projects
選Import exsting projects並且點你要的專案內容後按下一步
然後按Finish後將專案拉下來
接著你點開專案會發現這專案完全看不懂
不過不要緊張這個可以解決
點選專案右鍵→Properties
選到Project Facets,先點到Runtimes那邊將你的server打勾
這邊我用的是Tomcat 8.0、接著Dynamic Web Module、Java、JavaScript打勾後按OK
剩下的設定也要跟將專案推上來的人同步
像是Java編碼跟Html或Xml的編碼等等
然後按ok後就會發現親愛的專案他回來了
2015年9月4日 星期五
[教學]如何在Eclipse中使用Github(Dynamic project)(上)
因為有人反應說Eclipse使用Github相當複雜
稍微整理一下後說一點簡單的設定說明
本篇介紹的是將專案上傳,下篇會介紹怎麼將上傳的檔案拉下來
如何將推上去的專案拉下來請看這篇
首先要把Git的repository打開
點選window→showview→other
然後在GIT選項找到Git Repositories,找不到Git選項上面直接打Git搜尋關鍵字
點選你要上傳的專案右鍵→Team→Share Project
選擇Git
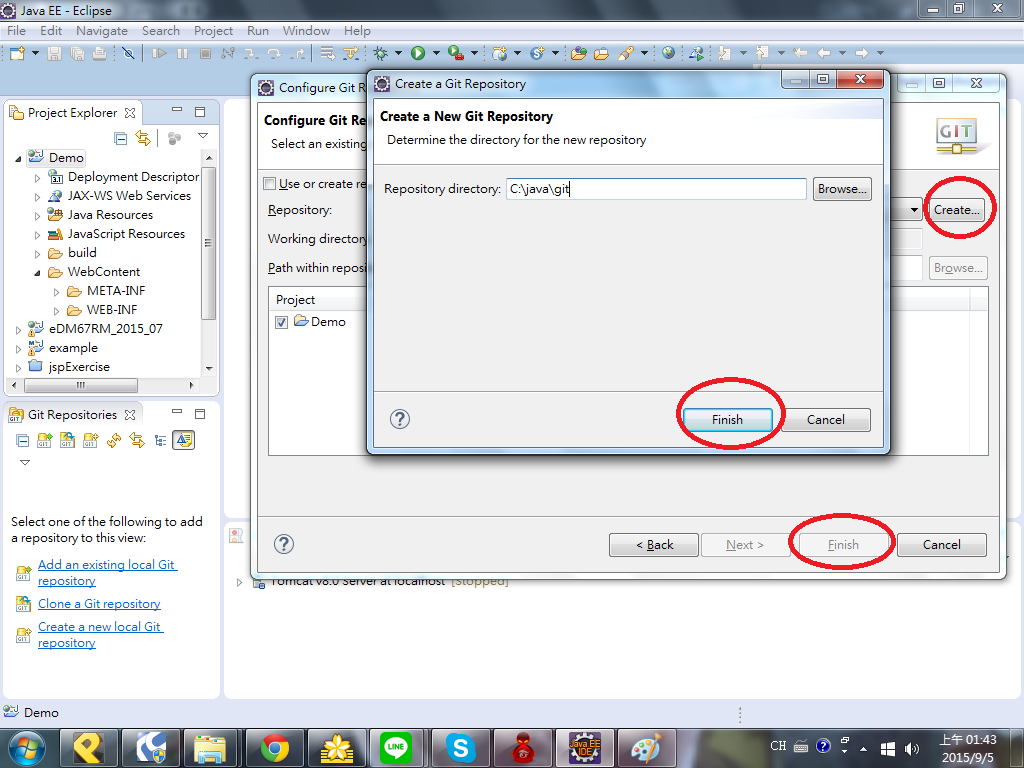
然後挑選一個你比較好找到的位置放你的Git檔案,最後按Finish
複製你Git的連結
因為把.classpath跟.project也設成ignore時Eclipse專案設定會很困難
所以建議在團隊都使用Eclipse時
將Working Directory/Demo/.gitignore下的設定成這樣
只忽略/build/跟/.settings/資料夾
/.classpath跟 /.project就不設定,之後比較好拉檔案下來
再來將檔案commit上去
因為這是範例commit的內容沒有很認真寫,以後不認真寫內文你就知道發現bug要回溯到想要的時間超難找的
然後把剛剛複製的連結貼上來
下方是Git帳號密碼
推的時候把master add上去按finish
如果看到這個畫面沒有挑出錯就表示資料推上去了
要詳細之道怎麼拉資料的請點選下面連結
這是下篇的連結
稍微整理一下後說一點簡單的設定說明
本篇介紹的是將專案上傳,下篇會介紹怎麼將上傳的檔案拉下來
如何將推上去的專案拉下來請看這篇
首先要把Git的repository打開
點選window→showview→other
然後在GIT選項找到Git Repositories,找不到Git選項上面直接打Git搜尋關鍵字
點選你要上傳的專案右鍵→Team→Share Project
選擇Git
然後挑選一個你比較好找到的位置放你的Git檔案,最後按Finish
複製你Git的連結
因為把.classpath跟.project也設成ignore時Eclipse專案設定會很困難
所以建議在團隊都使用Eclipse時
將Working Directory/Demo/.gitignore下的設定成這樣
只忽略/build/跟/.settings/資料夾
/.classpath跟 /.project就不設定,之後比較好拉檔案下來
再來將檔案commit上去
因為這是範例commit的內容沒有很認真寫,以後不認真寫內文你就知道發現bug要回溯到想要的時間超難找的
然後把剛剛複製的連結貼上來
下方是Git帳號密碼
推的時候把master add上去按finish
如果看到這個畫面沒有挑出錯就表示資料推上去了
要詳細之道怎麼拉資料的請點選下面連結
這是下篇的連結
2015年9月1日 星期二
[Java]Sting、StringBuffer與StringBuilder
String因為字串池的關係,當你做出下面的運算時
Sting x = "a"+"b"+"c"+"d";
JVM會產生四個String物件,所以當你有字要串起來時為了節省記憶體通常不會使用String
而會使用StringBuffer與StringBuilder
那麼StringBuffer與StringBuilder到底要選什麼用呢?首先要了解兩者的不同
StringBuffer與StringBuilder第一個不同在於兩者的效能有明顯的差距
如下面範例
那麼要建立String就用StringBuilder囉?
其實不見得
StringBuffer是synchronized,也就是在多執行緒上他比較不會發生錯誤
StringBuilder在多執行緒的程式上就必須注意Thread safe的問題
Sting x = "a"+"b"+"c"+"d";
JVM會產生四個String物件,所以當你有字要串起來時為了節省記憶體通常不會使用String
而會使用StringBuffer與StringBuilder
那麼StringBuffer與StringBuilder到底要選什麼用呢?首先要了解兩者的不同
StringBuffer與StringBuilder第一個不同在於兩者的效能有明顯的差距
如下面範例
public class Test {
public static void main(String[] args) {
int N = 77777777;
long t;
{
StringBuffer sb = new StringBuffer();
t = System.currentTimeMillis();
for (int i = N; i --> 0 ;) {
sb.append("");
}
System.out.println(System.currentTimeMillis() - t);
}
{
StringBuilder sb = new StringBuilder();
t = System.currentTimeMillis();
for (int i = N; i --> 0 ;) {
sb.append("");
}
System.out.println(System.currentTimeMillis() - t);
}
}
}
那麼要建立String就用StringBuilder囉?
其實不見得
StringBuffer是synchronized,也就是在多執行緒上他比較不會發生錯誤
StringBuilder在多執行緒的程式上就必須注意Thread safe的問題
2015年8月29日 星期六
[JAVA]Java物件使用 == 與 .equals方法的差別
在Java基礎資料形別(byte,short,int,long,boolean,char,float,double)的==判斷式就是檢查兩個資料的值是否相等,但是到物件參考形別是==表示的是兩個物件參考的記憶體位置是否一樣
比如說
Object A = new Object();
Object B = new Object();
A==B的時候就是false
而
Object A = new Object();
Object B = ObjectA;
A==B的時候結果是true
在這邊要檢查兩個物件裡面的參數是否一樣的時候就需要要用到.equals方法
這個方法是java.lang.Object的方法
所以在編寫class時可以被覆寫
你可以自行定義什麼情況下兩個class內容是相等的
就可以使用 A.equals(B)這種語法來判斷兩個物件是不是你定義的相同
String雖然是物件,但是因為字串池的關係
String A ="abc";
String B ="abc";
兩個字串物件會指到同一個記憶體位置
A==B的結果會是true
但是如果想要程式用一些method撈值用String存的話
A==B兩個字串即使值是一樣的結果也會顯示false
這時使用A.equals(B);
比較不會發生問題造成維護上的困擾
比如說
Object A = new Object();
Object B = new Object();
A==B的時候就是false
而
Object A = new Object();
Object B = ObjectA;
A==B的時候結果是true
在這邊要檢查兩個物件裡面的參數是否一樣的時候就需要要用到.equals方法
這個方法是java.lang.Object的方法
所以在編寫class時可以被覆寫
你可以自行定義什麼情況下兩個class內容是相等的
就可以使用 A.equals(B)這種語法來判斷兩個物件是不是你定義的相同
String雖然是物件,但是因為字串池的關係
String A ="abc";
String B ="abc";
兩個字串物件會指到同一個記憶體位置
A==B的結果會是true
但是如果想要程式用一些method撈值用String存的話
A==B兩個字串即使值是一樣的結果也會顯示false
這時使用A.equals(B);
比較不會發生問題造成維護上的困擾
2015年8月19日 星期三
[Android]把輸入的值傳到下一個畫面的方法
這個範例只是簡單的把帳號資料傳到下一個畫面
中間並沒有經過資料庫跟資料驗證
有興趣可以做個資料驗證,就可以做個簡單的登入程式
在專案裡的res/layout資料夾新增兩個xml檔如下:
login.xml:
中間並沒有經過資料庫跟資料驗證
有興趣可以做個資料驗證,就可以做個簡單的登入程式
在專案裡的res/layout資料夾新增兩個xml檔如下:
login.xml:
<?xml version="1.0" encoding="utf-8"?> <RelativeLayout xmlns:android="http://schemas.android.com/apk/res/android" android:layout_width="match_parent" android:layout_height="match_parent" > <TextView android:id="@+id/textView01" android:layout_width="wrap_content" android:layout_height="wrap_content" android:layout_alignParentLeft="true" android:layout_alignParentTop="true" android:layout_marginTop="18dp" android:text="帳號" /> <TextView android:id="@+id/textView02" android:layout_width="wrap_content" android:layout_height="wrap_content" android:layout_alignParentLeft="true" android:layout_below="@+id/textView01" android:layout_marginTop="14dp" android:text="密碼" /> <EditText android:id="@+id/editText01" android:layout_width="wrap_content" android:layout_height="wrap_content" android:layout_alignTop="@+id/textView01" android:layout_toRightOf="@+id/textView01" android:ems="10" android:inputType="textPersonName" > <requestFocus /> </EditText> <EditText android:id="@+id/editText02" android:layout_width="wrap_content" android:layout_height="wrap_content" android:layout_alignTop="@+id/textView02" android:layout_toRightOf="@+id/textView02" android:ems="10" android:inputType="textPassword" /> <Button android:id="@+id/button01" android:layout_width="wrap_content" android:layout_height="wrap_content" android:layout_alignRight="@+id/editText02" android:layout_below="@+id/editText02" android:layout_marginTop="16dp" android:text="送出" /> </RelativeLayout>
result.xml:
<?xml version="1.0" encoding="utf-8"?><RelativeLayout xmlns:android="http://schemas.android.com/apk/res/android"android:layout_width="match_parent"android:layout_height="match_parent" ><TextViewandroid:id="@+id/textView00"android:layout_width="wrap_content"android:layout_height="wrap_content"android:layout_alignParentLeft="true"android:layout_alignParentTop="true"android:text="Large Text"android:textAppearance="?android:attr/textAppearanceLarge" /></RelativeLayout>
然後編寫MainActivity.java檔如下
public class MainActivity extends Activity {TextView textView00 = null;EditText editText01 = null;EditText editText02 = null;Button button01 =null;public void onCreate(Bundle savedInstanceState){setContentView(R.layout.login);editText01 = (EditText) findViewById(R.id.editText01);button01 = (Button) findViewById(R.id.button01);button01.setOnClickListener(new View.OnClickListener() {@Overridepublic void onClick(View v) {String name = editText01.getText().toString();setContentView(R.layout.result);textView00 = (TextView) findViewById(R.id.textView00);textView00.setText("你好:"+name);}});}}
2015年8月13日 星期四
[SQL Server2012]將資料庫複製到別的資料庫-產生指令碼
首先點選要複製的資料庫滑鼠右鍵後選工作→產生指令碼
接著會出現摘要的畫面,不想看說明就不要理他直接按下一步
再來是選擇要匯出資料庫的內容,如果想全部複製就用預設值,
因為我不想複製預存程序我使用了自訂內容
再來這個畫面請按進階做一些進階設定
若是你要複製過去的Database有同名的資料的話,
只編寫CREATE指令資料就有可能放不進去
但是使用DROP指令要小心,你要確定那邊同名的資料庫沒有重要的資料
不然一執行那邊的資料可能就會毀掉,除非你確定另一邊沒有重要資料不然建議
不要使用 DROP and CREATE這個功能
指令碼很貼心的提供了舊的版本,有需要的話可以自行設定
若資料是要複製到Microsoft Azure的資料庫,請將屬性改為SQL Azure資料庫
如果是一般電腦上的資料庫就直接選獨立執行個體
這個選項要看你需要複製什麼出來
因為有時候你只是要抽出這些DataBase的結構來研究,並不需要裡面的資料
連資料一起抽出來的話檔案會很大
只要複製Table不要複製裡面的資料的話只要選擇僅限結構可以有限節省空間
預設是僅限結構描述,如果需要連資料一起複製出來的話
這個選項的屬性必須改成結構描述和資料
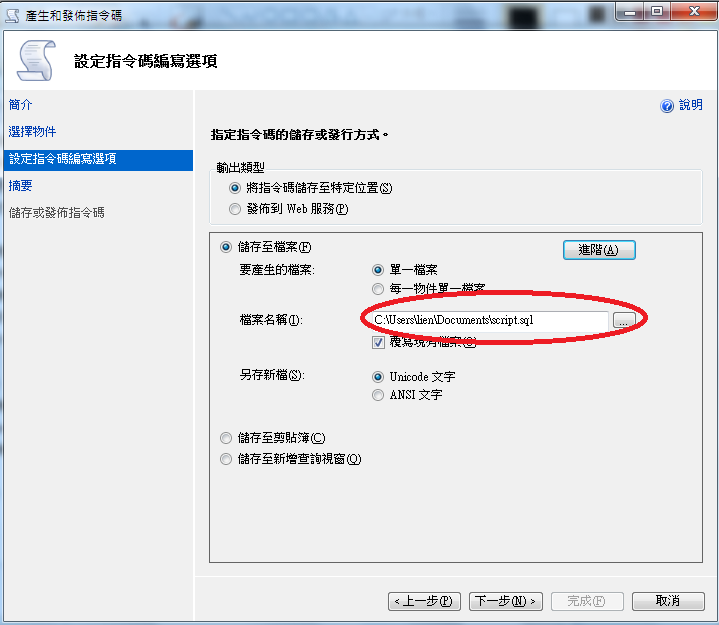
都設定完成後記得更改匯出的檔名與路徑方便尋找,
接著就是下一步&下一步
完成後就可以在剛剛的路徑找到對應的Sql檔了
2015年8月6日 星期四
[Java]Java的Static block與建構子(constructor)
Static block是Java中的一個用來初始化Static屬性的功能
一個Class中的Static block只會執行一次
建構子(constructor)則是每次new一個物件的時候就會執行一次
建構子的名稱要與class名稱相同,並且不允許同樣參數的建構子
使用static block與constructor的方法範例如下
一個Class中的Static block只會執行一次
建構子(constructor)則是每次new一個物件的時候就會執行一次
建構子的名稱要與class名稱相同,並且不允許同樣參數的建構子
使用static block與constructor的方法範例如下
public class StaticInitDemo {
private static String message;
private String message2;
static{
System.out.println("static block initialize");
setMessage("This is an demo of static block");
}
public StaticInitDemo(){
System.out.println("constructor initialize");
setMessage2("This message is generate as constructor");
}
public StaticInitDemo(String str){
System.out.println("constructor with parameter initialize");
setMessage2("str="+str);
}
public static String getMessage() {
return message;
}
public static void setMessage(String message) {
StaticInitDemo.message = message;
}
public String getMessage2() {
return message2;
}
public void setMessage2(String message2) {
this.message2 = message2;
}
}//end of class
public class StaticBlockDemo {
public static void main(String[] args) {
System.out.println("Test begin\n");
System.out.println("StaticBlock:");
System.out.println(StaticInitDemo.getMessage());
System.out.println("\n"+"Constructor:");
StaticInitDemo demo = new StaticInitDemo();
System.out.println(demo.getMessage2());
StaticInitDemo demo2 = new StaticInitDemo();
}
}//end of class
執行結果為:
Test begin
StaticBlock:
static block initialize
This is an demo of static block
Constructor:
constructor initialize
This message is generate as constructor
constructor initialize
訂閱:
文章 (Atom)